So let’s say you’ve had a laptop for some time now, but you’ve decided quite recently to enter the Wi-Fi era and bought yourself a wireless router. You arrive home all happy and joyful, but you suddenly realize that, although your router comes with a quick install guide, things aren’t really as straightforward as manufacturers want you to believe.
In order to setup your Wi-Fi router easier (so you and your laptop can enjoy wireless freedom), you can follow the simple steps outlined in this tutorial. I will have to warn you that the screens captures you’ll see in this guide belong to a D-Link DIR-655 router. They will be almost identical to most other D-Link routers and the fields and settings you will see in the photos will also match those provided by other companies' products as well.
The point is that basic setting are 99% identical on all routers, so you should have little trouble using this guide on other models.
Now, the first thing you need to know is that a router is kind of a separate computer. In fact, any old computer can be setup in order to function exactly like a router. Of course, configuring such a system is more than overkill, so it is best to buy a router. So, if a router is basically a limited network computer, then it should be accessible from any computer connected directly to it.
Each computer on a network is identified by an unique IP address, so the router should have one too. In the case at hand, the router uses the IP 192.168.0.1. You should consult your router manual in order to find out exactly what IP your router uses.
After you find out what IP you need to use in order to access the router, you have to connect your desktop or laptop to the router with an Ethernet cable. Remember, at this point, you can’t really use the router wirelessly, and most settings should be done from a wired connection. Most routers come with a bundled Ethernet cable for exactly this kind of problems. Connect the router to a PC on any of the router Ethernet ports. Try to use one of the regular ports, not the one marked as WAN.
Now start up Firefox (or Internet Explorer) and type in the router’s IP in the address bar. Hit enter and you should be greeted with the router’s login page.
As you can see, I chose to login as Admin (no default password, but you should check the manual to see if your router has a default password). After logging-in, you might be greeted with the status page. This provides information about the current state and configuration of the router.
Since your router doesn’t have any settings yet, we’ll be getting to them once we are required to configure them in the setup process.
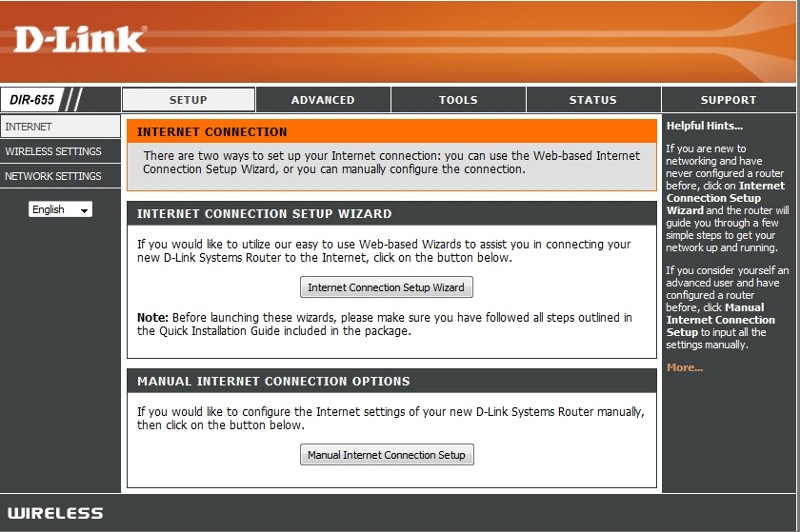
First you need to click on the SETUP tab (top left corner). Once there, choose “Manual Internet Connection”. I know most of you probably like wizards, but we will do it the hard way, so you'll get more familiar with some of the basic concepts in computer networks.
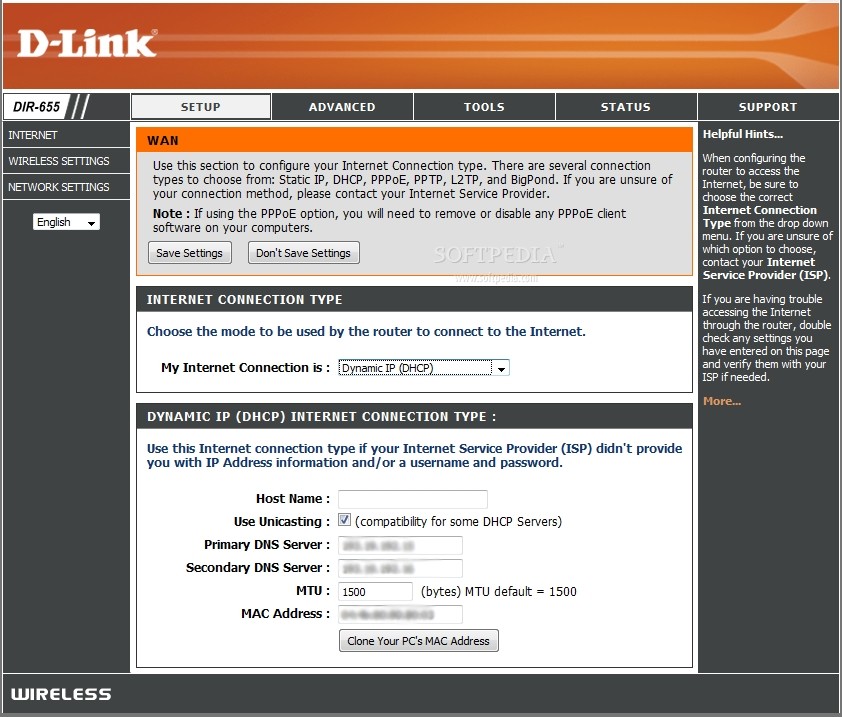
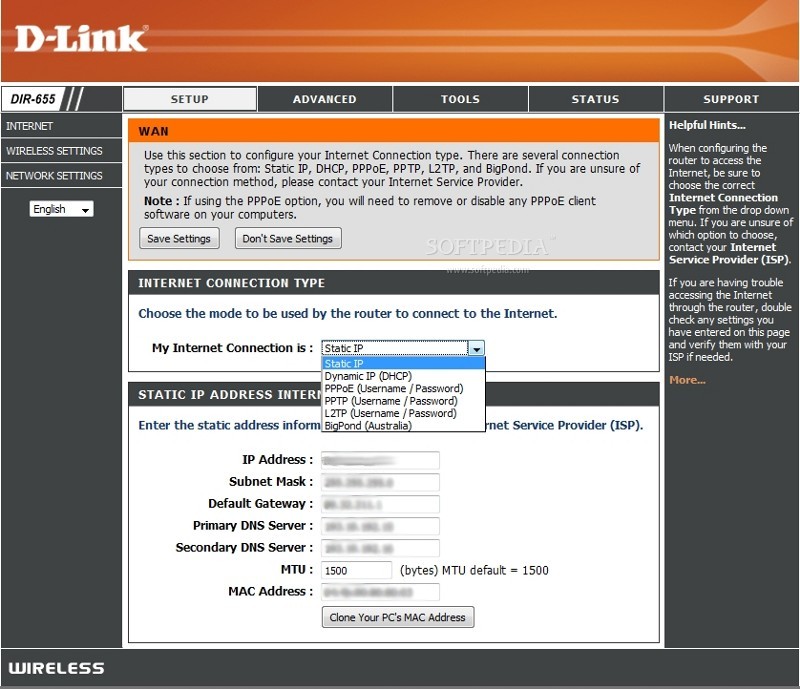
The first thing you are required to find out is what kind of network your ISP (Internet Service Provider) use. This isn’t difficult at all. If your ISP provided you with a set of 4-5 IP addresses you will have to choose “Static IP” and enter the provided IPs in their respective fields. The “IP Address” field represents your router’s IP address. Yes, after completing this task, your router will be viewable by computers outside of your network exactly by that IP address. The subnet mask is relevant for the network size and not really important for you, as an user. Just type it in and go to the next field.
The “Gateway” is critical, since in essence this will be the “machine” that actually provides you access to the rest of the Internet. Next, you have to enter two DNS servers. Note that only one of them is mandatory, the second can remain blank. It is imperative to have at least one DNS server. DNS stands for Domain Name Service and it’s basically the process by which Softpedia (or any other website, for that matter) gets translated into and IP address, which will be used to actually retrieve the web site information.
MTU (Maximum Transmission Unit) should be left at default value (if it’s not 1500, set it at this value). This represents the size of an Internet packet which leaves your PC. Every file and piece of data coming and going on the Internet is actually split in small packets so it can be sent a lot faster. “MAC Address” should be left untouched at this moment. Read on to find out more about the MAC address.
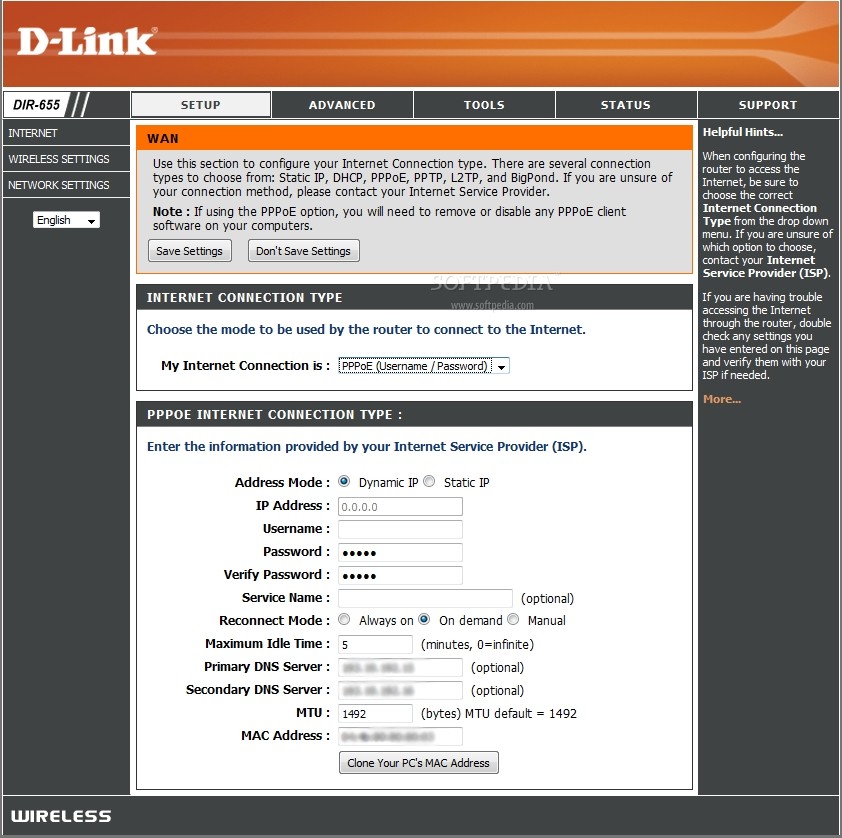
After you are done entering the settings, don’t forget to press the above “Save Settings” button. The router will probably require a reboot. Just sit back and wait for it to restart. Now, if your ISP has only provided you with one or two IP addresses (or maybe even none), then you should probably have a username and a password. No problem, the router knows what to do with them. Instead of selecting “Static IP”, just choose “PPPoE”. This stands for Point to Point Protocol over Ethernet. We won’t get into any details, since computer networking is extremely complicated and we just want to talk about the basics here.
After choosing PPPoE, you will be provided with another configuration panel. First, you need to choose between a Dynamic or Static IP. So, if your ISP has provided you with an IP address designated as a PC IP address, choose Static and type it in the field below. Otherwise, just select Dynamic. Next, enter the provided username and password. Leave the rest of the options as they are and check whether the ISP provided any DNS servers. If so, type them in the corresponding fields, otherwise, leave the fields blank, they will be set by the ISP upon establishing the connection. Again, don’t touch the MAC address.
There’s one more widespread method used in providing Internet to one’s clients: DHCP. This is used when the ISP provided you with no IP address and no username or password. The thing is that this kind of connection is usually bond to a MAC address. A MAC address represents the physical address of a network card. It is supposed to be unique for every manufactured network card and is used by routers and switches in directing network traffic. So, the problem is that you probably already have your desktop’s (or laptop’s) MAC address registered to your ISP and connecting the router won’t work since its WAN port (the port which will be used to connect the cable which actually provides you with an Internet connection) has a different MAC address.
The best solution would be to call your ISP and provide him with the WAN’s port MAC address so they can change their settings and allow the router to access the Internet. But if that doesn’t actually work (for whatever reason), you can just connect the router to your old Internet-enabled computer and press the “Clone Your PC’s MAC Address”. This will clone your computer’s network card MAC address to the routers WAN port and in the end fool the ISP in thinking the router is actually your old network card. DNS servers can be entered manually or not at all.
Great, now that we’ve setup your Internet connection settings, you can plug the Internet cable into the WAN port and continue this guide in order to setup the internal network settings. Depending on your router, at this point, connecting a PC by an Ethernet cable might or might not provide it with an active Internet connection. On the SETUP tab, click NETWORK SETTINGS on the left menu. This is where you setup how the router will manage all the computers that connect to it.
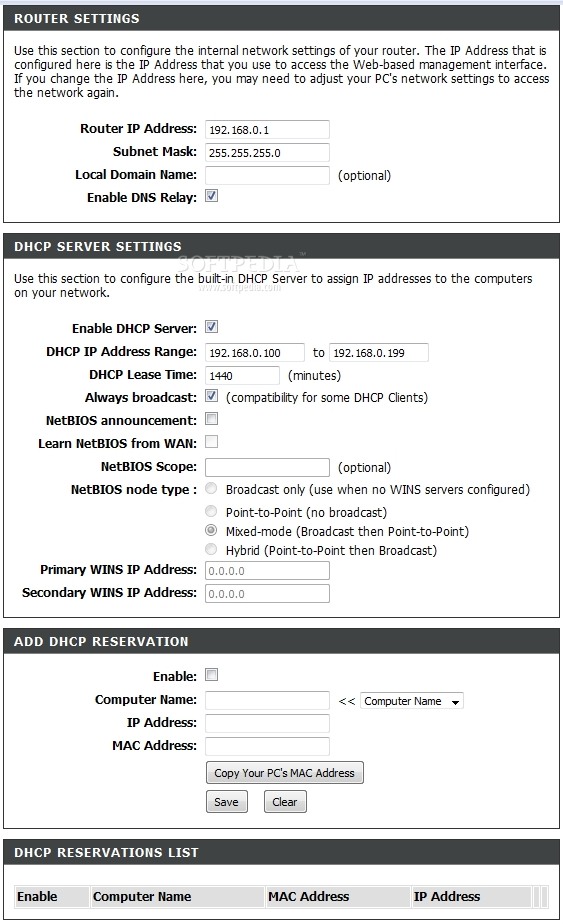
"Router IP Address” is the address you use to access the router setup menu. Don’t change it unless you have a reason to. But make sure “Enable DNS Relay” is checked. Next, you see the DHCP SERVER SETTINGS. This section is important, since we will use DHCP in order to automatically provide an IP address for any laptop or computer which connects to the router. So check “Enable DHCP Server” (if it isn’t already checked).
The router should provide you with a default DHCP IP “Address Range”. This range represents the number of IPs that the router will provide to the connected computers. If you want to connect more computers, you will need a larger range. The range should be something like 192.168.10 to 192.168.10.125. This range provides 116 different IP addresses. Leave DHCP Lease time at default (mine is 1440). Check “Allow Broadcast” and leave the rest of the settings unchanged.
Below these settings you can see the DHCP RESERVATION feature. DHCP dynamically allocates IP addresses, so a PC won’t always use the same IP address when it connects to the router. But if this is important for you, you can reserve a specific address for a computer in this section. Alternatively, you can also click reserve on the bottom list when the computer connects. The bottom list displays the DHCP clients that currently connect to the router. Now, we need to get into some security settings, since you don’t really want anyone with a wireless laptop or netbook to connect to your router and use your Internet connection. Bandwidth is precious. Again, in the SETUP tab click “WIRELESS SETTINGS”. Choose “Manual Wireless Network Setup” and you should see something like this.
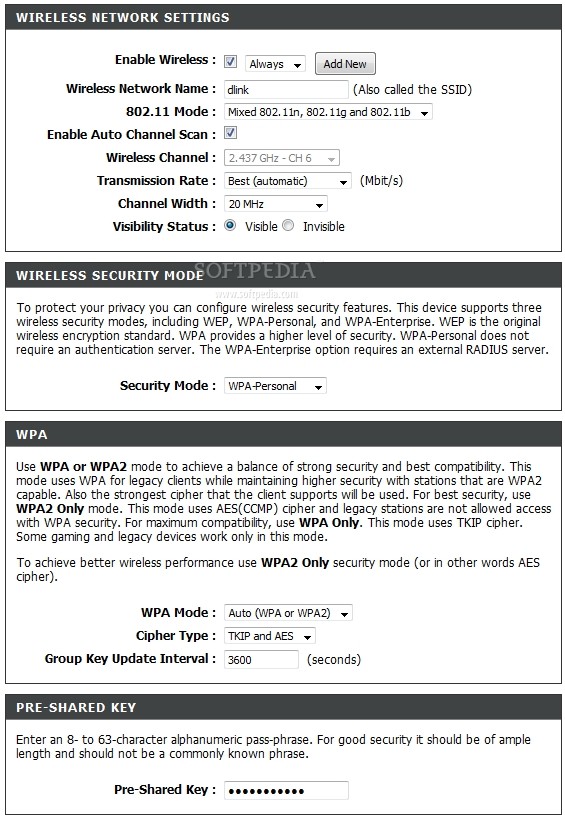
Of course, “Enable Wireless” should always be checked if you want to use a Wi-Fi connection. “Wireless Network Name” will be used to identify the network when scanning for wireless access points or when you want to hide the network. “802.11 Mode” should be “Mixed n,g,b” meaning the router can use different standards at the same time and provide each one with the best speed settings. Make sure “Enable Auto Channel Scan” is also checked. Leave the transmission rate on “Automatic”, while “Channel Width” should be set on “Auto 20/40 MHz”. Visibility should be on, unless you want the network not to appear on a “View Wireless Networks” scan. If you choose for the network to be invisible, you will have to provide the SSID upon connection.
Next, we have the wireless security mode, which only provides one option. Just select WPA-Personal from the dropdown box. Going down the list, we actually get to set the WPA settings. WPA mode should be” Auto (WPA or WPA2)” for compatibility concerns. “Cipher Type” - TKIP and AES. Leave the other settings at their default values. The last option requires you to enter the “Pre-Shared Key”. This is the actual password someone with a wireless card will have to type in when wanting to use your router. Be careful when choosing this password and make sure it’s at least 11-characters long and contains letters and numbers at the same time.
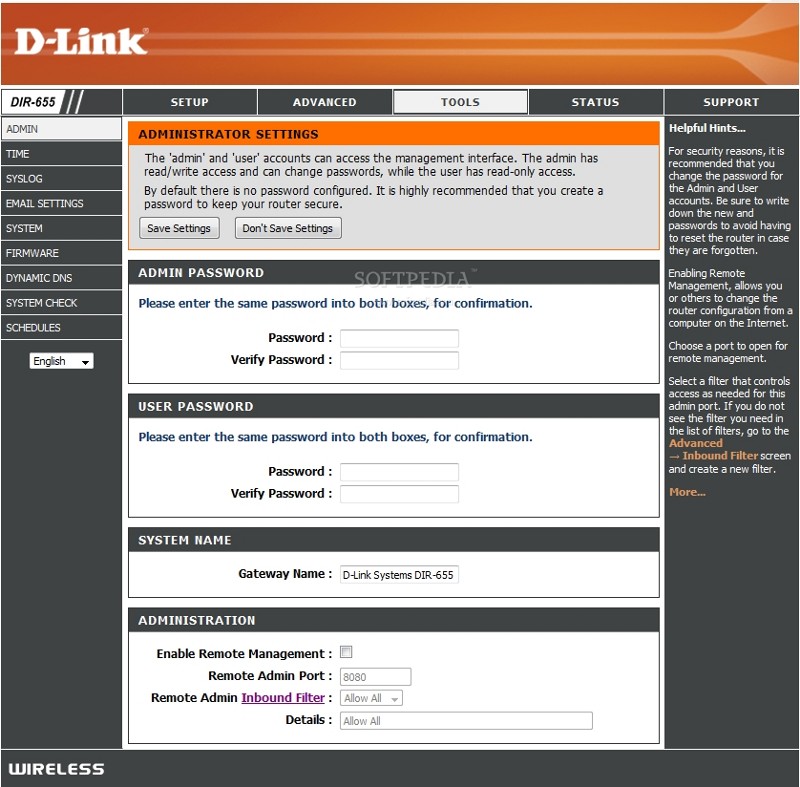
Remember how you used the 192.168.0.1 IP to access your router’s settings? Remember how you logged in as an Admin without any password? Not acceptable. Click the TOOLS tab in the top menu and select ADMIN from the left list. Type in an administrator password and an user password. Make sure you uncheck “Enable Remote Management”.
Well, I’d say we’re all done with security and we should be moving along to the some “Advanced” settings (they just call them advanced, you’ll see just how simple they really are). Click the “ADVANCED” tab on top and select the last option on the left menu: “ADVANCED NETWORK”. Make sure UPnP is checked so UPnP-ready software can take advantage of this feature. Personally, I like keeping “WAN Ping Respond” unchecked because I don’t like people knowing my router is available to anyone for remote hacking tests. Make sure the “WAN Port Speed” is set at “Auto 10/100/1000Mbps” leave other options untouched.
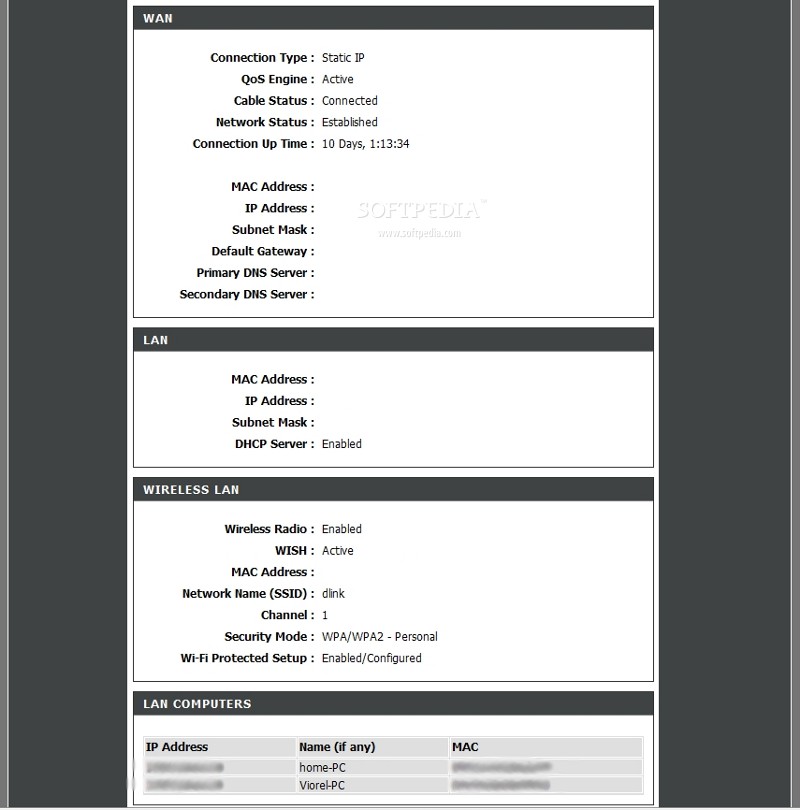
Remember to click “Save Settings” after you complete every task. Finally check the STATUS tab to see all your settings in place and have a go at it with your laptop. Enjoy wireless freedom and never look back, unless you’re parking.
In order to setup your Wi-Fi router easier (so you and your laptop can enjoy wireless freedom), you can follow the simple steps outlined in this tutorial. I will have to warn you that the screens captures you’ll see in this guide belong to a D-Link DIR-655 router. They will be almost identical to most other D-Link routers and the fields and settings you will see in the photos will also match those provided by other companies' products as well.
The point is that basic setting are 99% identical on all routers, so you should have little trouble using this guide on other models.
Each computer on a network is identified by an unique IP address, so the router should have one too. In the case at hand, the router uses the IP 192.168.0.1. You should consult your router manual in order to find out exactly what IP your router uses.
After you find out what IP you need to use in order to access the router, you have to connect your desktop or laptop to the router with an Ethernet cable. Remember, at this point, you can’t really use the router wirelessly, and most settings should be done from a wired connection. Most routers come with a bundled Ethernet cable for exactly this kind of problems. Connect the router to a PC on any of the router Ethernet ports. Try to use one of the regular ports, not the one marked as WAN.
 |  |  |
Now start up Firefox (or Internet Explorer) and type in the router’s IP in the address bar. Hit enter and you should be greeted with the router’s login page.
As you can see, I chose to login as Admin (no default password, but you should check the manual to see if your router has a default password). After logging-in, you might be greeted with the status page. This provides information about the current state and configuration of the router.
Since your router doesn’t have any settings yet, we’ll be getting to them once we are required to configure them in the setup process.
First you need to click on the SETUP tab (top left corner). Once there, choose “Manual Internet Connection”. I know most of you probably like wizards, but we will do it the hard way, so you'll get more familiar with some of the basic concepts in computer networks.
The first thing you are required to find out is what kind of network your ISP (Internet Service Provider) use. This isn’t difficult at all. If your ISP provided you with a set of 4-5 IP addresses you will have to choose “Static IP” and enter the provided IPs in their respective fields. The “IP Address” field represents your router’s IP address. Yes, after completing this task, your router will be viewable by computers outside of your network exactly by that IP address. The subnet mask is relevant for the network size and not really important for you, as an user. Just type it in and go to the next field.
 |  |  |
The “Gateway” is critical, since in essence this will be the “machine” that actually provides you access to the rest of the Internet. Next, you have to enter two DNS servers. Note that only one of them is mandatory, the second can remain blank. It is imperative to have at least one DNS server. DNS stands for Domain Name Service and it’s basically the process by which Softpedia (or any other website, for that matter) gets translated into and IP address, which will be used to actually retrieve the web site information.
MTU (Maximum Transmission Unit) should be left at default value (if it’s not 1500, set it at this value). This represents the size of an Internet packet which leaves your PC. Every file and piece of data coming and going on the Internet is actually split in small packets so it can be sent a lot faster. “MAC Address” should be left untouched at this moment. Read on to find out more about the MAC address.
After you are done entering the settings, don’t forget to press the above “Save Settings” button. The router will probably require a reboot. Just sit back and wait for it to restart. Now, if your ISP has only provided you with one or two IP addresses (or maybe even none), then you should probably have a username and a password. No problem, the router knows what to do with them. Instead of selecting “Static IP”, just choose “PPPoE”. This stands for Point to Point Protocol over Ethernet. We won’t get into any details, since computer networking is extremely complicated and we just want to talk about the basics here.
After choosing PPPoE, you will be provided with another configuration panel. First, you need to choose between a Dynamic or Static IP. So, if your ISP has provided you with an IP address designated as a PC IP address, choose Static and type it in the field below. Otherwise, just select Dynamic. Next, enter the provided username and password. Leave the rest of the options as they are and check whether the ISP provided any DNS servers. If so, type them in the corresponding fields, otherwise, leave the fields blank, they will be set by the ISP upon establishing the connection. Again, don’t touch the MAC address.
There’s one more widespread method used in providing Internet to one’s clients: DHCP. This is used when the ISP provided you with no IP address and no username or password. The thing is that this kind of connection is usually bond to a MAC address. A MAC address represents the physical address of a network card. It is supposed to be unique for every manufactured network card and is used by routers and switches in directing network traffic. So, the problem is that you probably already have your desktop’s (or laptop’s) MAC address registered to your ISP and connecting the router won’t work since its WAN port (the port which will be used to connect the cable which actually provides you with an Internet connection) has a different MAC address.
 |  |  |
The best solution would be to call your ISP and provide him with the WAN’s port MAC address so they can change their settings and allow the router to access the Internet. But if that doesn’t actually work (for whatever reason), you can just connect the router to your old Internet-enabled computer and press the “Clone Your PC’s MAC Address”. This will clone your computer’s network card MAC address to the routers WAN port and in the end fool the ISP in thinking the router is actually your old network card. DNS servers can be entered manually or not at all.
Great, now that we’ve setup your Internet connection settings, you can plug the Internet cable into the WAN port and continue this guide in order to setup the internal network settings. Depending on your router, at this point, connecting a PC by an Ethernet cable might or might not provide it with an active Internet connection. On the SETUP tab, click NETWORK SETTINGS on the left menu. This is where you setup how the router will manage all the computers that connect to it.
"Router IP Address” is the address you use to access the router setup menu. Don’t change it unless you have a reason to. But make sure “Enable DNS Relay” is checked. Next, you see the DHCP SERVER SETTINGS. This section is important, since we will use DHCP in order to automatically provide an IP address for any laptop or computer which connects to the router. So check “Enable DHCP Server” (if it isn’t already checked).
The router should provide you with a default DHCP IP “Address Range”. This range represents the number of IPs that the router will provide to the connected computers. If you want to connect more computers, you will need a larger range. The range should be something like 192.168.10 to 192.168.10.125. This range provides 116 different IP addresses. Leave DHCP Lease time at default (mine is 1440). Check “Allow Broadcast” and leave the rest of the settings unchanged.
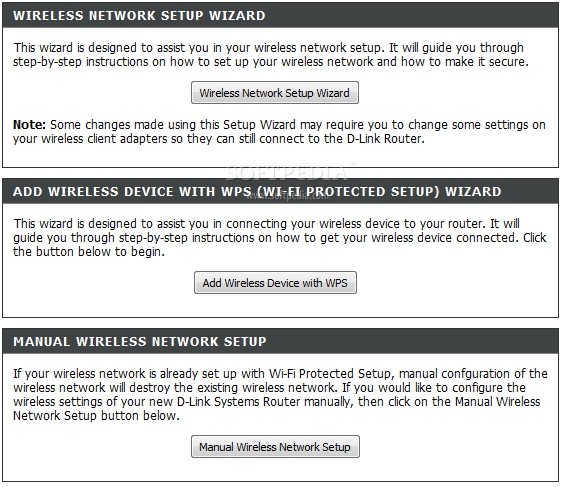 |  |
Below these settings you can see the DHCP RESERVATION feature. DHCP dynamically allocates IP addresses, so a PC won’t always use the same IP address when it connects to the router. But if this is important for you, you can reserve a specific address for a computer in this section. Alternatively, you can also click reserve on the bottom list when the computer connects. The bottom list displays the DHCP clients that currently connect to the router. Now, we need to get into some security settings, since you don’t really want anyone with a wireless laptop or netbook to connect to your router and use your Internet connection. Bandwidth is precious. Again, in the SETUP tab click “WIRELESS SETTINGS”. Choose “Manual Wireless Network Setup” and you should see something like this.
Of course, “Enable Wireless” should always be checked if you want to use a Wi-Fi connection. “Wireless Network Name” will be used to identify the network when scanning for wireless access points or when you want to hide the network. “802.11 Mode” should be “Mixed n,g,b” meaning the router can use different standards at the same time and provide each one with the best speed settings. Make sure “Enable Auto Channel Scan” is also checked. Leave the transmission rate on “Automatic”, while “Channel Width” should be set on “Auto 20/40 MHz”. Visibility should be on, unless you want the network not to appear on a “View Wireless Networks” scan. If you choose for the network to be invisible, you will have to provide the SSID upon connection.
Next, we have the wireless security mode, which only provides one option. Just select WPA-Personal from the dropdown box. Going down the list, we actually get to set the WPA settings. WPA mode should be” Auto (WPA or WPA2)” for compatibility concerns. “Cipher Type” - TKIP and AES. Leave the other settings at their default values. The last option requires you to enter the “Pre-Shared Key”. This is the actual password someone with a wireless card will have to type in when wanting to use your router. Be careful when choosing this password and make sure it’s at least 11-characters long and contains letters and numbers at the same time.
Remember how you used the 192.168.0.1 IP to access your router’s settings? Remember how you logged in as an Admin without any password? Not acceptable. Click the TOOLS tab in the top menu and select ADMIN from the left list. Type in an administrator password and an user password. Make sure you uncheck “Enable Remote Management”.
Well, I’d say we’re all done with security and we should be moving along to the some “Advanced” settings (they just call them advanced, you’ll see just how simple they really are). Click the “ADVANCED” tab on top and select the last option on the left menu: “ADVANCED NETWORK”. Make sure UPnP is checked so UPnP-ready software can take advantage of this feature. Personally, I like keeping “WAN Ping Respond” unchecked because I don’t like people knowing my router is available to anyone for remote hacking tests. Make sure the “WAN Port Speed” is set at “Auto 10/100/1000Mbps” leave other options untouched.
Remember to click “Save Settings” after you complete every task. Finally check the STATUS tab to see all your settings in place and have a go at it with your laptop. Enjoy wireless freedom and never look back, unless you’re parking.
No comments:
Post a Comment